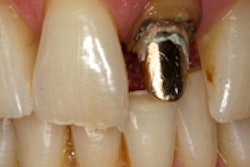
In this clinical case, techniques will be illustrated that can make crown removal, extractions, and grafting a more simple, predictable, and efficient procedure for the dentist, regardless of overall extraction and grafting experience, or confidence with such procedures. In the first part, Dr. Kosinski provided background and discussed removal of the crown using the WAMkey system (Golden Dental Solutions).
Step 2
 Timothy Kosinski, DDS.
The second step of the treatment was to perform an atraumatic extraction. Atraumatic means less damage to the bone surrounding the root and less pressure on the root of the tooth, allowing removal of even fractured or damaged roots. It also means that there is less negative experience for patients, as they do not feel the forces and trauma of conventional techniques. Finally, being able to remove even the most difficult teeth with no hand, forearm, bicep, or shoulder strength is a positive experience for the dentist.
In this case, the tooth was sectioned, where the beak of the Physics Forceps (Golden Dental Solutions) could easily engage each root of the tooth treated as if it were the extraction of two bicuspids. With the forceps, I find that maxillary molars never have to be sectioned, but in the case of divergent mandibular molars, it can make the extraction process easier to section the tooth (figure 1).
 Figure 1: Using a surgical bur, the lower molar divergent roots are sectioned into two roots, where now the tooth can be extracted as two individual roots using the Physics Forceps. All images courtesy of Dr. Timothy Kosinski.
The Physics Forceps are a modified first-class lever consisting of two components. Tension is applied with the beak, or flattened end of the instrument, onto the palatal aspect of the tooth. The second part of the instrument, referred to as the bumper, is placed onto the facial aspect of the tooth as deep in the vestibule as possible. The bumper acts as a fulcum, and the working end of the instrument is the beak that engages the root of the tooth 1 mm to 3 mm subgingivally. The handles are held firmly but never squeezed (figure 2).
 Figure 2: The Physics Forceps instrument handles are never squeezed but held lightly in your hands, so the instrument is really a lingual elevator rather than a forcep. The handles should be held very lightly, allowing the instrument to do the work. No strength or arm pressure is required. Little pressure is placed on the bumper or fulcrum point.
They allow for tension to be created onto the palatal aspect of the root, creating a physiologic release of enzyme that breaks down the periodontal ligaments (PDL). Once the PDL is destroyed, the tooth is simply elevated up and out of the socket. The instrument is not intended to deliver the tooth from the socket; rather a tooth delivery instrument is used to remove the tooth from the socket site, leaving a socket with all four walls intact (figures 3-8).

Step 3
Atraumatic extraction techniques provide a defect with all four walls intact or without bone damage (figure 9). This creates a site that can be explained to the patient as a cereal bowl or ice cream cone that can be easily and efficiently filled with grafting materials. Once the tooth is removed, it is imperative to remove any remaining granulation tissue from the socket using a sharp curette.
 Figure 9: The extraction site. The socket site is aggressively curetted, removing any granulation tissue resulting from the socket.
Then the decision needs to be made as to what type of socket grafting material should be used. For example, autogenous graft is bone material from the patient. A block of bone could be removed from a site on the patient, such as the symphysis or retromolar pad area. This would involve a second surgical procedure to harvest the bone. This is not always ideal or preferred by the patient.
A more popular technique is to use allograft material (bone from the same species -- human) or an alloplastic material (a synthetic such as tricalcium phosphate), which have both proved to be predictable. Xenografts are made from another species, such as cow bone. In general, all these materials require the use of a membrane to protect the graft from invagination of epithelial cells.
At a minimum, simple socket grafting following an atraumatic extraction has become an integral part of general dental treatment and should be offered to patients to prevent bone resorption. Following extraction of a nonrestorable tooth, the remaining socket heals from the apex toward the crest. When nothing is placed into the socket at the time of the extraction, the soft-tissue infiltration at the crest often results in facial and crestal bone loss. This will often impede ideal implant placement in the future or will require more invasive grafting procedures in the future, which is a secondary surgery for the patient that could have been prevented.
In this case, I demonstrate a simple technique that can be used when all walls are intact using a product called Osteogen Plugs (Golden Dental Solutions) (figures 10-13). Osteogen is a highly crystalline osteoconductive bioactive resorbable calcium apatite bone graft that is physicochemically similar to human bone. The bioactive and resorbable crystal clusters control migration of connective tissue and form a strong bond with newly growing bone. Its hydropilic 3D matrix leads to immediate absorption of blood flow, which is important for the initiation of bone formation, early angiogenesis, and bone bridging even across large defects. The Osteogen material is a low-density bone graft and, thus, will be radiolucent on the day of placement (figure 14).

As the crystals are resorbed physiologically by osteoclast and osteoblast activity, the site will become more radiopaque. This collagen promotes keratinized soft-tissue coverage while the graft forms new bone. As mentioned earlier, this is not just a collagen plug. This is a combination of bovine Achilles tendon collagen matrix and bioactive resorbable calcium apatite. It is important to understand the difference between the materials available. Placing a collagen-based clotting material, such as a 100% collagen plug, is not considered simple socket grafting and will do little to maintain bone contours in the edentulous space. Although there are many options for simple socket grafting today, you must consider techniques that are both predictable, simple, and cost-effective for you and your patient.
I recommend having the appropriate grafting training to enable more advanced grafting in the case of larger defects, including membrane placement, but these techniques are absolutely within the reach of all dentists regardless of grafting or extraction knowledge or experience.
Timothy Kosinski, DDS, is in private practice in Bingham Farms, MI, and is an affiliate adjunct clinical professor at the University of Detroit Mercy School of Dentistry. He can be reached at [email protected].
The comments and observations expressed herein do not necessarily reflect the opinions of DrBicuspid.com, nor should they be construed as an endorsement or admonishment of any particular idea, vendor, or organization.