Dental impression materials are used to record oral anatomy for the fabrication of fixed restorations and removable prosthodontics and appliances. The accuracy of these restorations depends on proper tooth preparation, the impression material, the technique used, and excellent communication with the dental laboratory. Elastomeric impression materials, addition silicone (PVS) and polyether, are popular because of their excellent physical and mechanical properties, including excellent detail reproduction, high elastic recovery and good dimensional stability. The condensation silicones and polysulfides are not commonly used clinically, although dental laboratories still use the condensation silicones as duplicating materials.
This issue of THE DENTAL ADVISOR (April 2008, Vol. 25:3) reviews the properties and clinical characteristics of addition silicone and polyether elastomeric impression materials. Clinical tips for the entire dental team are provided.
| Table of contents |
Addition Silicone Impression Materials - Light-body

Addition Silicone Impression Materials - Heavy-body

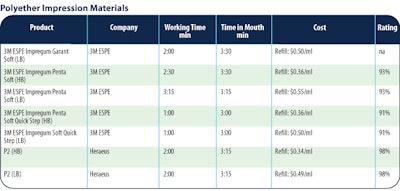
Polyether Impression Materials

Wettability (hydrophilicity) - impression material should be able to displace moisture and form intimate contact with the tooth and soft tissues. It should not form bubbles or voids.
Flexibility - flexible impressions are easier to remove from the mouth when set.
Elastic recovery - set impression should return to its original dimensions upon removal from undercut areas in the mouth without distortion. The highly cross-linked structure of addition silicones provides excellent elastic recovery.
Tear strength - impression material must resist tearing upon removal from the mouth, especially in interproximal areas, and when separating the model from the impression.
Detail reproduction - impression material must reproduce the finest details of the oral tissues and be able to transfer these details accurately to gypsum dies.
- Low viscosity: typically a wash or light-body.
- High viscosity: typically tray, heavy-body or putty.
- Auto-mixed, easy to use.
- Acceptable odor and taste.
- Non-toxic and non-irritating.
- 1.0-1.5 minutes working time.
- 3.0-3.5 minutes setting time.
- Distinctive color contrast between viscosities.
- Ability to be disinfected.
- Compatible with die materials.
- Adequate shelf life.
- Cost-effective.
Helpful Hint - Each manufacturer has unique naming conventions to describe viscosity types. It is always best to follow manufacturer's guidelines for mixing and matching.
Also called polyvinyl siloxanes (PVS), addition silicones are the most accurate of the elastomeric impression materials. Supplied in extra light, light, medium, monophase, heavy, and putty viscosities, these materials have excellent elastic recovery due to their cross-linked structure, a range of flexibility, and good resistance to tearing.
Advantages
Disadvantages
|
 Aquasil Ultra - DENTSPLY Caulk  Flexitime - Heraeus  Virtual - Ivoclar Vivadent |
Polyethers are available in low and high viscosities and are supplied in polybags designed for automatic mixing machines. They are hydrophilic, providing superior wettability and adherence to a preparation, resulting in good surface detail. Some polyethers have short working and setting times and should not be used when making impressions of multiple teeth. The high rigidity of some polyethers makes impression difficult to remove from the mouth. To improve the flexibility, increase the thickness of the material between the tray and teeth from 2 to 4 mm. Because of a lower tear strength, some polyethers are best used for impressions of supragingival preparations.
Advantages
- Excellent wettability (hydrophilic).
- Good short-term dimensional stability.
Disadvantages
- Poor taste and color.
- Low tear strength of some products.
- Some formulations are rigid.
- Immersion disinfection can change the dimensional stability fo the impression.
Helpful Hint - Follow the manufacturer's directions on disinfection carefully to minimize any change to the impression.
- Prefit the tray to the patient before adding the material. This technique will help determine if the tray will seat properly to help ensure an accurate impression.
- Apply the correct adhesive to all internal surfaces and the perimeter of the impression tray. Let the adhesive dry completely before adding the impression material.
Helpful Hint - Perforated trays are designed to work without adhesive. The material oozes through the perforations in the tray and holds the material in place. - Make sure the openings of the auto-mix cartridge are not blocked. Express a small amount of material before placing the mixing tip.
- Keep the tip of the syringe buried in the expressed material during loading to minimize bubbles.
- High temperatures and humidity reduce working and setting time.
- Do not use a fast-setting formulation (e.g. tray material) with a regular-set formulation (e.g., wash material). It could lead to distortion.
- The surface (e.g., tabletop) you use to mix putty needs to be cleaned, disinfected, and debris removed before use.
- Due to its rigidity, indent the surface of the putty in the area of the preparation to allow the light-body to flow properly around the preparation.
- Patients should be sitting upright for all impressions to ensure proper occlusion and minimal burn-through.
- As the material begins to set, the viscosity of the impression material increases and the capture of detail decreases. This is especially important for fast-set materials.
- Extrude a small amount of light-body material, with the tip on, before placing intraorally.
- Using a circular motion, extrude light-body material in one movement around the circumference of the preparation base to ensure proper occlusion. Continue the circular motion until the preparation is covered.
- Select a tray of adequate size and shape; prefit the tray to fully seat the tray in the mouth.
- Keep the tip of the syringe buried in the expressed material to minimize bubbles.
- Seat the loaded tray in a timely fashion. Movement of partially polymerized material will cause internal stresses leading to an inaccurate impression.
- Removal of an impression before complete setting will cause distortion.
- Communicate with your lab.
Many quality control issues are due to poor technique. - Use a quality material.
Typically, a more costly impression material is using higher quality raw materials. A better material leads to better results. - Use a uniform amount of impression material in the tray.
High spots and low spots can cause distortion on the final impression. - Ask your lab if they prefer to pour the model. Many do and they will use the material they prefer.
- When taking an impression, put a 2" x 2" square of gauze opposite the preparation. This will help balance the occlusion and minimize burn-through.
- Patients with erupted third molars are not good candidates for posterior closed-bite trays. The lack of space and proper occlusion may result in inaccurate articulation.
The clinician should use loupes or magnification to examine and evaluate the impression before sending it to the lab. Areas to evaluate are:
- homogeneously mixed impression material.
Helpful Hint - Using the mixing tips that come with the impression material can help with providing a homogeneous mix. The tips are specifically designed to meet the mixing needs of each product. - Material should be uniformly distributed in and supported by the tray.
- Margins should appear clear and sharp.
- All viscosities of material should blend with each other.
- Fine detail should be clearly recorded with no major visible defects.
- Impression adhered to the tray.
- No burn-through.
Helpful Hint - Check for tray-to-tooth contact in the impression. If any portion of the tray is visible, it can lead to inaccuracy of the impression. Take another impression.
- Anatomical irregularities in the mouth (tori) can interfere with and distort a closed-bite tray. Hand trimming a tray or making a custom tray can help seat the tray fully in the mouth.
- If a patient has a strong tongue, avoid using a closed-bite tray. There is a greater chance of a distorted impression.
- Leave the impression in the mouth until the material is completely set. Removing the tray too early could result in distortion.
Gingival Retraction Materials
Expasyl - Kerr Corporation
GingiTrac - Centrix Dental
Magic FoamCord - Coltne/Whaledent
- Isolate the prepared tooth.
- Inject the material around the sulcus.
- Have the patient bite on to a dry cotton roll.
- Keep in place for five minutes.
- Remove, rinse, dry, and immediately take the impression.
Astringents
Astringedent - Ultradent
FS Hemostatic- Premier Dental Products
Stat-Gel FS - Pascal
ViscoStat - Ultradent
- Apply ferric sulfate solution to stop the bleeding, then pack a dry cord.
- Rinse the site thoroughly to prevent the ferric sulfate solution from interfering with the setting of addition silicone (PVS) impression materials.
Alginate Substitutes
An alginate substitute is an addition silicone (PVS) impression material that provides a detailed impression without hand-mixing. These new materials are available in double-barrel cartridges and in polybags for automatic mixing machines.
3M ESPE Imprint 3 Position Penta Quick - 3M ESPE
AlgiNot - Kerr Corporation
freealgin - Zhermack, Inc.
Silgimix - Sultan Healthcare
StatusBlue - Zenith Dental/DMG
Advantages
- Higher patient acceptance than traditional alginate.
- Shorter setting time.
- Good hydrophilic properties.
- Easy removal from the mouth.
- No hand-mixing or powder/liquid to mix.
- Excellent detail reproduction, elastic recovery and dimensional stability (can be stored and reused).
- Dust-free and compatible with gypsum die material.
Disadvantages
- Much more expensive than traditional alginate.
- The material sets very hard and can be a challenge to separate from the model.
Virtual Impressions - CAD/CAM Systems
This new technology will allow a dentist to take a virtual impression of the preparation and send it directly to the laboratory via the internet. A hand-held digital scanner provides a 3-D image of the preparation. Two types of scanners are currently available and designed for in-office milling or in conjunction with a dental lab.
Scanners for In-office Milling
CEREC 3D - Sirona Dental Systems
E4D IntraOral Digitizer - D4D Technologies
Scanners for Dental Laboratory Milling
3M ESPE Lava Chairside Oral Scanner - 3M ESPE
iTero Digital Impression System - Cadent
Advantages
- No need for impression materials, trays or accessories.
- Impressions can be transmitted and stored electronically.
- No mess.
- 3D, 360° view of the preparation that can be moved and turned to see every angle.
- Adjustments can be made to the virtual impression, no need for a second impression.
- No disinfection required.
Disadvantages
- Start-up cost.
- Technique sensitive.
- Learning curve.
- More equipment required.
Implant Impression Materials
Clinicians performing implant surgery have a need for sterile, radiopaque
impression materials. These materials are designed with a high rigidity and high
dimensional accuracy to provide the clinician with a highly detailed impression.
Elite Implant - Zhermack
- Sterile.
- Radiopaque.
- High rigidity.
- High dimensional accuracy.
Automatic Mixing Machines
Automatic mixing machines are easy to use and help dental professionals achieve a homogeneous mix of impression material. Recent advances in this technology include hands-free operation and product recognition chips. These chips are implanted by the manufacturer to identify the type of material and the proper working time for that material.
|
3M ESPE Pentamix 3 - 3M ESPE Advantages
Disadvantages
|
 Duomix - DENTSPLY Caulk  Flexitime Dynamix - Heraeus |
Requests for reprints should be directed to The Dental Advisor.