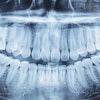
The x-ray is one of the most potent diagnostic weapons in the dentist's arsenal. But over time, it's easy to take x-rays for granted, to take sloppy shots, to make the same mistakes over and over, and worse, unnecessarily expose patients to more radiation, due to retakes.
That's the hard news delivered by Edwin Parks, D.M.D., M.S. and Gail Williamson, R.D.H., M.S., both of Indiana University, in their "Picture Perfect Quality Radiographs" session given at the Yankee Dental Conference 33 recently held in Boston. (Full disclosure: Dr. Parks is a DrBicuspid.com Advisory Board member.)
The duo's goals in this session? To show you how to minimize patient and operator exposure; identify and correct errors in intraoral and panoramic radiographs (both digital and film); how to manage patients to get better shots; and altogether improve the quality of your radiography.
The surprisingly entertaining session covered everything from selection criteria and using receptors properly, to taking sharper images and avoiding goofs in the darkroom, all illustrated with Professor Williamson's colorful anecdotes and Dr. Parks' droll humor. This first article focuses on intraoral radiography; part II will delve into the panoramic side.
 |
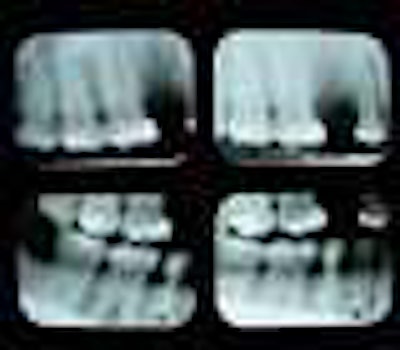
| A typical underexposed shot. These images cannot be corrected digitally. |
Basic mistakes, basic fixes
So where do dentists and their staffs go wrong? For starters, notes Williamson, the basics are often ignored, from film handling to angulation. "Proper technique is a matter of geometry," says Williamson. "And getting the patient to cooperate -- and getting a better picture -- is a matter of psychology."
Some common errors and the fixes:
Quit relying on default settings. "Every patient is different and requires a unique radiographic assessment," says Williamson. Take a medical and dental history, look for clinical signs and symptoms, and consider the patient's age, size, weight, and various risk factors.
"A lot of practices are still using slow D speed film!" says Williamson, with a hint of exasperation in her voice. "Simply by switching from D to F speed film, you can reduce the patient's radiation dose by 60 percent," she says. Switch from D to digital x-ray, and you'll reduce the exposure by 80 percent.
Pick the right receptor. Use a receptor with a rare earth intensifying screen (using phosphors of lanthanum or gadolinium) and you'll likewise minimize exposure even further. And no, receptor holders aren't "cheating" -- they can help standardize picture taking and reduce the number of errors and retakes.
Place the film as close to the object as possible. The receptor should be parallel to the tooth, and at a 90 degree angle to the x-ray source. To reduce patient exposure and penumbra (shadow), use a collimator. You'll get sharper images.
If you can't get a parallel placement -- say, due to patient discomfort -- use the bisecting angle technique. This allows the clinician to control the length of the tooth structure to avoid elongation or foreshortening. Just remember that there's bound to be some distortion, because the receptor and beam are not aligned in parallel.
Keep the darkroom dark! Especially if you're using faster film. Eliminate light leaks and use proper safe lighting; change the developer frequently; and maintain the equipment. There's nothing more galling than having to retake a series of X-ray images because the processor, "ate the film". "And you know darn well that this will happen with that cranky patient who didn't want x-rays taken in the first place," says Williamson.
Get the lead out. Although there's debate about the need for lead aprons and collars, when in doubt, use 'em. Patients expect to be shielded (with apron and collar). Use the shields and they'll feel reassured, and be more cooperative. A key handling tip: Never fold an apron. This creates creases, which can let radiation through.
Watch your dose! That means taking the MPD (maximum permissible dose) guidelines established foir clinicians seriously, especially if you're pregnant. To minimize your exposure, don't hold the x-ray head or PID, don't hold the receptors in the patient's mouth, and don't hold the patient in position. If something or someone must be held, have a properly-shielded family member do it. You're getting exposed to x-rays every day; they're not.
By the same token, you don't have to hide in a bunker when taking x-ray images, says Williamson. Remember the distance and position rule -- if you're 6 feet from the source and angled 90° to 135° from the primary beam -- you're safe.
 |
| A horizontal angulation error can produce an image with interproximal overlap. |
Anatomical and other challenges
Sometimes you can't get a parallel placement. Sometimes the patient gags no matter what you do. Others fidget or slump, ruining the shots. Williamson's advice:
Bag the gag reflex. Gagging means the patient can't breathe. The trick, says Williamson, is getting the patient to breathe through their nose. Try classic distraction techniques -- have the patient bend their toes, hum, raise one leg -- so they don't focus on gagging. Try the classic placebo technique -- put salt on their tongue. Still another trick: Put a dab of topical anesthetic on their soft palate or the edge of the film. Don't use a spray, warns Williamson. A topical gel gives you more control. Finally, says Williamson, "wrap the offending edge of the film with tissue sponges. It's like a sock on a bare foot."
Tori tori tori! Place the receptor behind the torus and toward the midline. Likewise place topical anesthetic on the torus and tissue sponges on the film to minimize discomfort. Note: Because tori increase the thickness and density of bone in these areas, you may need to increase the exposure time to get a sharp image.
Classic errors, simple solutions
They're oldies but goodies -- film placement errors, angulation snafus, exposure gaffes, and more. What are the common errors and how can you avoid them?
 |
| If the vertical angle is too small, the image is elongated. |
Where's that receptor? Putting the receptor in the wrong place -- or putting in it backwards -- are all common mistakes, says Williamson. The area you want to shoot isn't covered, crowns are cut off, and worse. The correction? Place the film more toward the midline and check that orientation!
Angulation errors. If the vertical angle is too great, the image may be foreshortened -- like a shadow cast when the sun is overhead. The fix: Decrease the vertical angle. If the vertical angle is too small -- easy if you're using flexible plates -- the image is elongated. The fix: Increase the vertical angle.
Use bitewings? Forced to place receptors diagonal to the teeth? Watch out for horizontal angulation errors, which produce a too-wide image with interproximal overlap. The solution is to shoot the x-rays through interproximal surfaces.
Central ray cone-cut errors. If your film is only partially exposed, it isn't in the right place or the tubehead isn't pointing at the center of the film. Solution: Properly align everything, with the ring centered over the film.
Exposure errors. Once again, says Williamson, don't rely on default settings. "Look at your subject! A big guy needs a longer exposure, a small 80 year old woman, much less," says Williamson. Underexposed shots can't be corrected digitally, she says. Overexposed pictures can be fixed. "But the more you fuss with an image, the worse it gets."
Processing boo-boos. "Darkroom errors are a major cause of retakes," says Williamson. Rinse film thoroughly with fixer or it will turn yellow. Temperature and timing can take their toll. So, too, can feed errors (due to the mechanism advancing the film), which leave permanent artifacts (akin to bite marks!) on the image.
For more detail on radiographic do's and don'ts, check out these pieces by Professor Williamson and/or Dr. Parks:
Digital Radiography: An Overview
The Journal of Contemporary Practice