You may have the best panoramic x-ray machine ever made, but without good technique, it won't do anything for you or your patients. In part I of this series, we examined the technology and business decisions involved in digital panoramic x-rays. In this second part, we explore the human side of getting good images. There are no dark secrets, but experienced practitioners have plenty of tips.
"Going digital won't automatically solve all of your imaging problems," according to Gail Williamson, R.D.H., M.S., a professor of oral pathology, medicine, and radiology at Indiana University. "It all starts with staff skills."
While digital pans may be easier to read because of increased contrast and provide more precise detail, patient positioning and patient instruction are absolutely critical to producing good images in either technology.
According to Dale Miles, D.D.S., M.S., a consultant in oral and maxillofacial radiology, three steps will lead you to reliable, high-quality pans: machine preparation, patient preparation, and patient positioning. "The technology is way ahead of the education," he said, at the 2008 ADA annual meeting.
Machine prep is a matter of following the manufacturer procedures and checklists. Patient prep is more individualized.
Always ask if the patient has anything removable in the mouth or attached to the head, Dr. Miles suggested. If the answer is yes, the object should be removed. That covers potential intraoral obstructions such as chewing gum or partial dentures, as well as earrings, hearing aids, tongue studs, hair barrettes, and other objects that could confound the image.
As the slide show in this article shows, patient positioning is all about three-dimensional geometry. The midline must be vertical, the occlusive plane must be horizontal, and the anterior-posterior plane must be straight, Dr. Williamson said. That can leave the patient's head in an awkward forward thrust position to keep other body structures out of the focal trough and out of the image.
Many newer pan units have built-in light guides to help position the patient, Dr. Williamson said. Some models include a mirror so the patient can see the guides and aid in the adjustment. An autoadjustment feature on more expensive units can compensate in one plane if the other two planes are properly aligned.
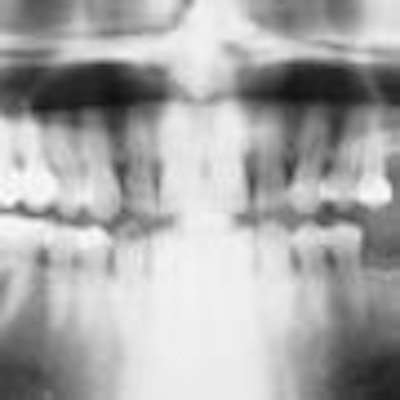
Images that are not clear and sharp offer obvious clues to positioning error, Dr. Miles said. If the anterior teeth are narrowed, the patient was too far forward. If the anterior teeth are grossly magnified and blurred, the patient was too far back.
If the image shows a flattened curve of Spee, with the upper teeth shortened, the apices blurred, and the lower teeth perfectly formed, the chin was too high. If the image shows an exaggerated curve of Spee, with the anterior portion of the mandible exaggerated in what Dr. Miles calls a "Jay Leno jaw," the condyles drawn inward toward each other, or the hyoid bone superimposed on the mandible, the chin was too low.
If the teeth on one side of the pan are larger, the entire head was rotated. If one angle of the mandible is higher than the other, the head was canted, or tilted, to one side.
"Positioning is the killer," Dr. Miles said. "If you don't position properly, you will get an ugly pan."
The typical patient instructions are to close the eyes, close the lips around the pin, press the tongue to the room of the mouth, and swallow. Staffers often forget to explain why these instructions are important, Dr. Williamson said.
Closing the eyes helps hold the head still. If you see a moving object, the natural reaction is to follow it, she explained. When patients can't see the receptor in motion, they don't try to track it.
Closing the lips around the pin also helps hold the head still.
Putting the tongue to the roof of the mouth and swallowing moves this dense tissue out of the primary image area. If the tongue is at the bottom of the mouth during the exposure, the additional tissue density can obscure root area detail.
"If patients don't understand the reasons we ask them to do something, they don't always cooperate very well," Dr. Williamson said. "They can't realize how important it is if we don't tell them."