This case involved a healthy 73-year-old woman and her general dentist. She was deciding between two clinical treatments: an implant to replace tooth #4 or a fixed partial denture from teeth #3 and #5 with pontic #4. The patient was encouraged to obtain an implant instead of a fixed partial denture (bridge) because of longevity, especially with her caries susceptibility. Figure 1 shows the site with bone level indicated by red arrows.
 Figure 1: The patient's bone level is shown by the red arrows in this preoperative radiograph.
There was inadequate tooth structure for restorations at #3 mesial and #5 distal because of decay near the crest of the alveolus.
Treatment plan
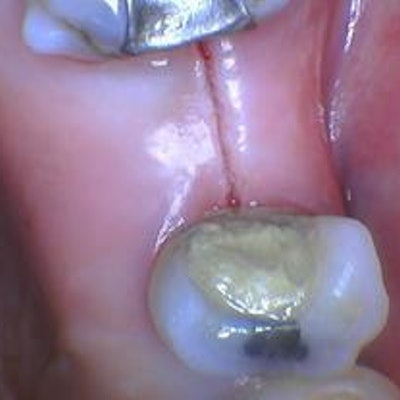
Tooth #5 had endodontic treatment and needs a core and full-coverage restoration. Tooth #3 will be treated conservatively with a composite restoration if the patient does not choose a fixed partial denture. Figures 2 and 3 show the patient's preoperative condition.
 Figures 2 and 3: Clinical photographs show the patient's preoperative condition.
For the progression of this case in the photos, a red arrow is used in the distobuccal of tooth #5 to denote a reference point relative to tissue level.
Laser technique
For treatment, the practitioner used a Solea laser (Convergent Dental) on the "hard and soft tissue" setting with the cutting speed controlled with the rheostatic foot pedal. The patient was anesthetized with 1.7 mL of articaine 4% with epinephrine 1:100,000 and 1.8 mL of bupivacaine 0.5% with epinephrine 1:200,000.
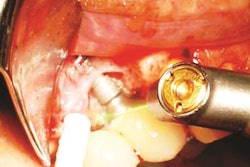
The initial scalpel-like incision (figure 4) was made along the crest of the edentulous ridge. The flap incision was around teeth #3 and #5, severing the periodontal attachment, while not touching the adjacent tooth.
 Figure 4: An initial scalpel-like incision was made along the crest of the edentulous ridge.
Next, the periodontal flap was raised using traditional periodontal instrumentation. Osseous tissue was ablated to establish the biologic width while exposing sufficient tooth structure coronal to the alveolus for proper restoration.
The spot size was switched to a smaller diameter for more precise control while ablating bone adjacent to the tooth structure. Note the good blood perfusion of the alveolar bone. The red arrow in figure 5 shows the bone level relative to a reference point near the cementoenamel junction after bone ablation before suturing. The flap is shown before approximation and suturing (figure 6).
 Figure 5 (left): The red arrow shows the bone level relative to a reference point near the cementoenamel junction after bone ablation before suturing. Figure 6 (right): The flap is shown before approximation and suturing.
The level of the alveolar bone was checked radiographically (figure 7) before closure with the level of the alveolus indicated with red arrows. The flap was closed and sutured with four interrupted 3.0 silk sutures. The distobuccal of #5 can be seen with improved gingival tissue position immediately after suturing, as indicated by a red arrow at the reference point. Figure 3 shows the #5 distobuccal in its preoperative state. Figure 8 shows the progression of tissue level apically. The entire procedure was completed in about 50 minutes.
 Figure 7 (left): Radiograph shows the level of the alveolar bone before closure with the level of the alveolus indicated with red arrows. Figure 8 (right): The progression of tissue level is shown apically.
5-month follow-up
The patient was prescribed chlorhexidine 0.12% rinse twice per day for 10 days and 500 mg of azithromycin for the first day after surgery, followed by 250 mg on days 2 through 5. The patient returned for suture removal nine days postoperatively and showed no evidence of infection.
Because she was caring for a sick husband, the patient did not return until five months later. The ridge and gingiva around teeth #3 and # were healthy (figures 9 and 10) with normal periodontal probing depths.
 Figures 9 and 10: At five-month follow-up, the ridge and gingiva around teeth #3 and #5 were healthy with normal periodontal probing depths.
Laser vs. scalpel
When done without a laser, this procedure is typically completed with a scalpel and high-speed handpiece with burs, and it often takes more than 90 minutes to complete. Using this laser also allowed the general dentist to undertake and complete this procedure, which generally would have been referred to a periodontist. The dentist would not be comfortable performing this procedure with a high-speed handpiece because of the significant risk of iatrogenic damage.
Joshua Weintraub, DDS, served in the U.S. Navy Dental Corps as a lieutenant in Okinawa, Japan, and Washington, DC. He is currently in private practice in Stevenson, MD, and is an international lecturer on laser dentistry.
The comments and observations expressed herein do not necessarily reflect the opinions of DrBicuspid.com, nor should they be construed as an endorsement or admonishment of any particular idea, vendor, or organization.