Case Authoring Tool Help
- What does the tool do?
- Who can use it?
- How to add new case?
- How to edit case?
- How to copy and paste?
"Case Authoing" is a web based tool that has the following functions:
- Add a new case for the DrBicuspid Case Study.
- Edit the existing case
Any DrBicuspid member can create a Case. You can share this case with your colleagues by sending them the complete URL. Contact the DrBicuspid editorial team if you wish to submit your case for possible acceptance as a Case Study for general display.
How to add new cases?
Click button "Add New Cases" on the authoring home page, then you will work through the following pages:
- Case information: This page is used to collect the general informaiton of the pages. All the fields are optional except the following:
"Case Title","# of images" and "# of pages". Please limit "Case Title" to 60 characters or less.
- Upload Images: This page is used to upload the images used in the case from local computer. There are two types of images: full size image and image thumbnail. Upload of the full size images are required . The thumbnail images are optional. If you don't upload the the thumbnails, the program will automatically generate the thumbnails by resizing the full images. When you edit the page later on, you have the choice of which image to use and what type of the image to use. This page only show up when there are images in the case. If you enter "0" in field "# of images" on "Case Information" page, then this page will not show up, and you will be directed to "Page Editor" page directly.
- Edit Page: This page contains a panel where you create and edit the case. You can enter text (case history, for example), insert images (if you upload any in the previous page) and questions on the page.
Two type of questions are supported: "mulitple choice question" and "true or false question". You can insert images and add questions by clicking the coresponding icons or links at the
top of the panel. As you may already entered the "Case Title", "case findings" and "case diagnosis" on
the "case information" page, for your convience, you can put them on the page where they are needed by clicking the corresponding links
at top of the panel. This will save your time to enter them again.
Please not the following when you edit a page:- The page edit panel is not a WYSIWYG (what you see is what you get) editor. Click the preview button to view the pages after you finish the case.
- The inserted questions, "case history","case findings" and "case diagnosis" will be appended to the current text in the panel. They are not inserted the current cursor position.
- On the preview page, if extra blank space found between two objects, you can remove them by deleting the space between the two objects in the editor panel.
- For each type of question, you are allowed to enter 1 to 5 choices. If you have less than 5 choices, just leave the other choices blank.
- Do not change the text in purple on the question templates.
Click button "Edit Cases" on the authoring home page. All the cases that you created will be listed on the next page. But, you can only edit the case which has not been used on the website. You can not edit the cases which are already online. To edit the case, click the link "edit" next to it. You can do the following when you edit the case:
- Edit case information
- Edit the content of specific page
- Add new page at specific position
- Add new images to the case. (You can't delete the images you uploaded before. But, you have a choose which images to be used in the case.)
- Delete a page
If you are using IE7 to copy and paste, you might see the following pop up window.
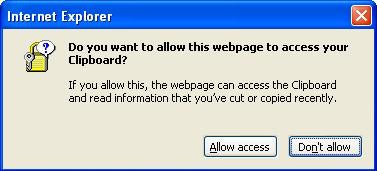
This is because the editor try to remove the styles from the contents that will be copied. Select "Allow access" in this case.
To turn off this pop up window, follow the steps below:
- Go to Tools -> Internet Options.
- Go to Security tab.
- Select “Internet” zone, then click on “Custom level…” button.
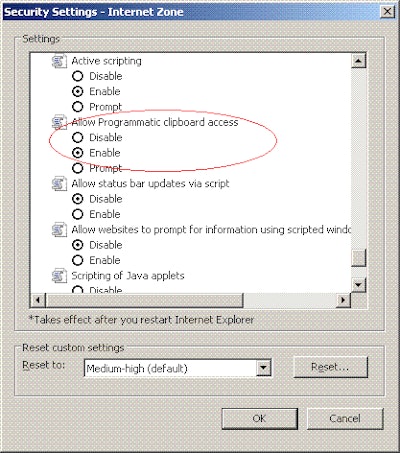
- Scroll down to “Scripting” section (see the figure below).
- Under “Allow Programmatic clipboard access” option, check or select Enable. Default action for this option is Prompt, which cause the pop-up message whenever there is any attempt to access the Clipboard.
- Click Ok to exit from Internet Options.
