Dr. Meena Barsoum is back with another clinical tip, courtesy of CDOCS. This time, Barsoum has a case study that illustrates a need with his dental patient's anterior teeth and how communication with the lab was critical in making the case come together.
Video transcript
"This is Meena Barsoum with CDOCS, and welcome to the tip of the day.
"Today, I want to talk about anterior cases, specifically when working with a laboratory, and a couple of ways that you can help guide your preparations so you're only reducing the areas that need reduction.
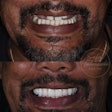
"So here's a case I completed recently. This patient presented, as you can see on the screen, obviously, a lot of severe, severely decayed restorations, outlived composite restorations. The biggest challenge for Greg here is that he needs orthodontics. And if you look at the initial STL of his teeth, you can notice he has a lot of crowding in the anterior. He has tooth #9, extremely facially positioned, and tooth #10, extremely lingually positioned.
"Now, I've been seeing Greg for about eight years now, and we've talked about this two times a year for the last 18 years, and he just simply will not undergo orthodontic therapy. So at this point, we're starting to see the decay is getting much worse on the teeth, and we need to do something.
"So we discussed all the alternatives and decided that we're going to restore his case with porcelain. So one of the things I like to do is I'll order a diagnostic wax-up from my lab technician. You can see on the screen here, this is the wax-up, the STL of the wax-up.
"The challenge I have right now is, how do I know where to prep? Obviously, some of the teeth are going to be additive. Some of them are going to be subtractive. How do I know where to go and how to prepare the teeth?
"What my lab technician has been sending me is what we call a merged file. So the beauty of this merged file, it gives me a file that I can then create a matrix from. It will seat passively over his existing teeth, and it will show me where the current teeth are and where the new teeth are going to be, so I can reduce appropriately where needed.
"So what I did is I 3D printed this model. I created a copy class matrix, as you can see here on the screen, using my MiniSTAR pressure former and then loaded that with any bis-acyrl material you have in the office. In this case, it was Integrity. I loaded it with Integrity and then seated it in the patient's mouth. What this does is it gives me a reference point of where the final restorations are going to be and where the current teeth are so I can see exactly where it's going to be additive and where it's going to be subtractive.
"I simply take my depth-cutting burrs, I make my depth cuts through the rest of the transfer bis-acryl, and then I finish my preparations after that. It's just an easy way to get information into the patient's mouth to guide you in your preparations so that you're only preparing the areas that are needed.
Hopefully, this was a helpful tip. We look forward to seeing again soon in future videos. Take care."
