By combining a digital workflow and shell technique, CAD/CAM restorations can be created with the form and texture of natural teeth, resulting in an authentic-looking smile, according to a case report published in the Journal of Esthetic and Restorative Dentistry.
Having access to digital libraries that contain images of real teeth of varying sizes and shapes made it plausible to perform an anatomic shell technique that resulted in restoring a 38-year-old patient's natural smile, the authors wrote.
"The concept of 'natural restorations' involve the combination of a digital workflow and a shell technique to create CAD/CAM restorations with natural form and texture," wrote the authors, led by Dr. Lauren Bohner, MSc, PhD, of the department of cranio and maxillofacial surgery at Hospital University Münster in Germany (J Esthet Restor Dent, February 23, 2023). "This case report describes an interdisciplinary periodontal/restorative digital workflow to achieve anterior CAD/CAM restorations with natural results."
38-year-old with gaps, misaligned teeth
A 38-year-old patient visited the dentist due to spaces between the anterior teeth and teeth misalignment, which previous orthodontic treatment with fixed appliances hadn't corrected. The patient wanted another treatment option rather than a second round of orthodontic treatment.
The patient's medical and dental history were unremarkable, but the clinical exam showed disharmony between dental and periodontal tissues, which was characterized by gingival recession, diastemas, unbalanced gingival levels, and unfavorable dental proportions. Also, there were damaged tooth surfaces and textures, especially at the incisal edges, according to the report.
To restore harmony between the hard and soft tissues, an interdisciplinary treatment plan was created. The treatment began with a facially driven aesthetic analysis, which was done using a digital smile design app. Photos and intraoral scans were taken and documented using digital smile design photographic protocols, the authors wrote.
Smile workflow
First, a smile frame with ideal dental proportions was drawn on photos and overlapped with intraoral scans. The desired smile was then simulated digitally to provide an overview of treatment possibilities.
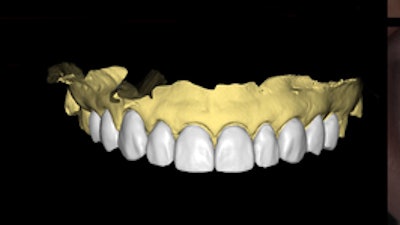
Using a digital library containing different shapes and sizes of natural teeth, a digital wax-up was designed based on the patient's proportions. This technique made it possible to replicate anatomical details and the surface texture of natural teeth in the wax-up. To analyze the relationship between the patient's smile and facial expressions, the digital wax-up was placed over the photos, they wrote.
 Intraoral photos and digital documentation of the patient that were used for treatment planning. Images courtesy of Bohner et al. Licensed by CC BY 4.0.
Once the patient accepted the expected result, clinicians elaborated on the treatment plan, which included periodontal and restorative treatment. The plan included periodontal surgery, teeth whitening, and fabrication of CAD/CAM ceramic veneers.
The patient's cone-beam computed tomography scan files were matched to intraoral scan files. Surgical planning was transferred to a digital surgical guide, which allowed clinicians to assess the relationship between periodontal and dental tissue in cross-sectional views, the authors wrote.
 For periodontal surgical planning, linear measurements showing the relationship between hard and soft tissues were performed. 1. The distance between the current gingival margin and the cement-enamel junction (2.15 mm). 2. The distance between the cementoenamel junction and bone (3.20 mm). 3. Distance between the current and the ideal gingival margin (1.18 mm). 4. Distance between the current gingival margin and bone (5.35 mm). 5. Distance between the ideal gingival margin and bone (4.17 mm). Also, clinicians designed and printed a crown-lengthening guide to steer the periodontal surgery.
Based on the measurements of gingival and bone tissue with the anterior teeth, a crown lengthening guide was designed and printed to guide resection.
After a two-month healing period, photos and an intraoral scan were taken to analyze the patient's periodontal condition and begin restorative treatment. Based on the previous digital wax-up, shells were printed and tried on.
Restoration began by manufacturing resin guides to orient teeth preparation. The initial digital wax-up was used as a reference, and preparation guides were designed and printed, according to the report.
 The image shows the try-in of the digital wax-up. After periodontal surgery, the shells were placed in the patient's mouth to determine final adjustments before the teeth preparation.
Clinicians performed tooth reduction according to the first preparation guide. Using additional guides, labial and incisal reduction were performed. The monolithic CAD/CAM restorations, which were designed and milled using a lithium disilicate material, provided a natural appearance.
 Preparation guides, which were designed digitally and placed in the mouth, were used to control the preparation procedure (A) and to control the labial (B) and incisal (C) reduction.
After tooth preparation, the mouth was scanned, and the tooth shade was selected. To guide the restorations, the digital models were superimposed onto the digital wax-up. Then, the final restorations were completed. In the end, the similarities between the wax-up, the mock-up, the designed restorations, and the final restorations could be seen, the authors wrote.
 The digital workflow. Upper left: digital wax-up; upper right: postsurgical mock-up; lower left: digitally designed ceramic restorations; lower right: final ceramic restorations. The workflow reproduced a form and texture that show a predictable, lifelike result.
A natural-looking smile
Though ceramic restorations are known to have favorable aesthetic outcomes, replicating nature can be challenging due to the vertical and horizontal concavities of real teeth. This is important, since anatomical differences and surface texture affect color saturation, value, and light reflection of natural teeth, the authors wrote.
"The design and manufacturing of CAD/CAM natural restorations using a digital workflow allowed a predictable result and overcame the limitations of conventional shell technique," Bohner and colleagues concluded.